Thursday, January 28, 2010

Penguin on Ice.


Currently we are looking deeper into the bizier tool, gradients, and nodes. Each of us had to pick at least one item to construct from the list, my choice was the penguin. I used many new path operations that I had never used before.
For this I had to the use the path operation intersection which made the one circle turn into two circlers where the grey fades into black. Gradients were also used for the feet, nose, eyes, Background and eye lids. The bizier tool was used for the arms, and the ice to make it look more realistic.
During this project I learned many new path operations and other ways to use the bizier.

Monday, January 25, 2010

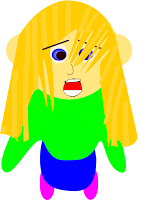
Cartoon Head


During this cartoon head design we watched a youtube video that just taught us the basic head with basic hair. After creating this I went on to change the hair to a girls hair and changed the basic mouth and nose.
I learned more about nodes especially with the hair pulling it in and out to create the fringe for the hair. Also I added more nodes in the hair to be able to make more strands of hair. We also used gradients for the eyes to make them look more realistic and have the blue change from white to blue. Gradients was also used in the Blonde to brown parts of the hair using 16 differnt stops.
We also did more work with the Bezier too to draw free hand lines or shapes. My whole mouth was created with the Bezier tool.
I learned a lot more through this creation especially while using the bezier tool and nodes..


Heart with Background


This heart was a step up from the basic heart that we created a couple of lessons ago. As shown this heart has more power, example being it looks 3-D other than flat like the other heart.
The skills that we learned during this were the duplication of the hearts to create the 3-D look. We had to duplicate the hearts and add gradient to make it look like the colors were changing in just one heart but there were actually 5 hearts in this drawing.
We learned the shine technique by using a circle and a shrunken 4 point star. All of these new techniques make the drawing look more alive and brings more character to it.


Thursday, January 21, 2010

Introduction to Inkscape- Shapes.

(Heart with Gradient.)

This is my first time taking the digital art course, and already we have learned many new concepts and things in Inkscape. Inkscape is the program we have been using to create vector graphics. We have just been having our introduction to inkscape and hearts were some of the first shapes we learned.

During the process of learning the heart we learned about the tools on the side bar as well. Nodes were some of the main things that we have to learn and keep learning about. You can make the node symmetrical and that will change how the shape is set up. From just a basic circle we were able to create a simple heart from just pulling the nodes in and out. Also I had to change how the node was set up,for the top part of my heart I had a symmetrical node, and the bottom point of my heart I had a triangular node. By changing these properties it makes the shape.

We also learned about the Bizeio tool, although we didn't use it make our hearts and four leaf clovers, but we did still learn about it. You can freely draw straight lines or circular lines with this tool. I find the nodes very confusing at times but at other times it is quite easy, all depending on the shapes and properties. I found that making the heart was not so difficult, even when we had to use the gradient inside of it. The gradient was the thing that changed the hearts colors smoothing throughout the heart as you can see in the picture as it went from blue, yellow, pink and everything in between.